No products in the cart.
Pulling vs. Blowing Fiber: A Beginner’s Guide – Part 2
Home Pulling vs. Blowing Fiber: A Beginner’s Guide – Part 2
- Home
- Resource Hub
- Millennium Blog
- Pulling vs. Blowing Fiber: A Beginner’s Guide – Part 2
Pulling vs. Blowing Fiber: A Beginner's Guide - Part 2
Blowing Fiber Basics
Blowing fiber, also known as jetting, is when a machine is used to float, or push, fiber optic cable forward through a conduit run with highly pressurized air. While the set-up is more involved, blowing fiber is great for long distances and can go thousands of feet.
Benefits of blowing fiber:
- Fewer splice points and handholes needed
- Fewer crew members needed for fiber deployment
- Save of material and labor costs
- Efficiencies of scale across longer distances
Employee wages are oftentimes the largest cost associated with fiber network builds, and fiber blowing machines can lower these labor costs by reducing installation time. However, blowing fiber is a relatively new technology, and training is required for proper operation, installation, and maintenance of the equipment.
How to blow fiber
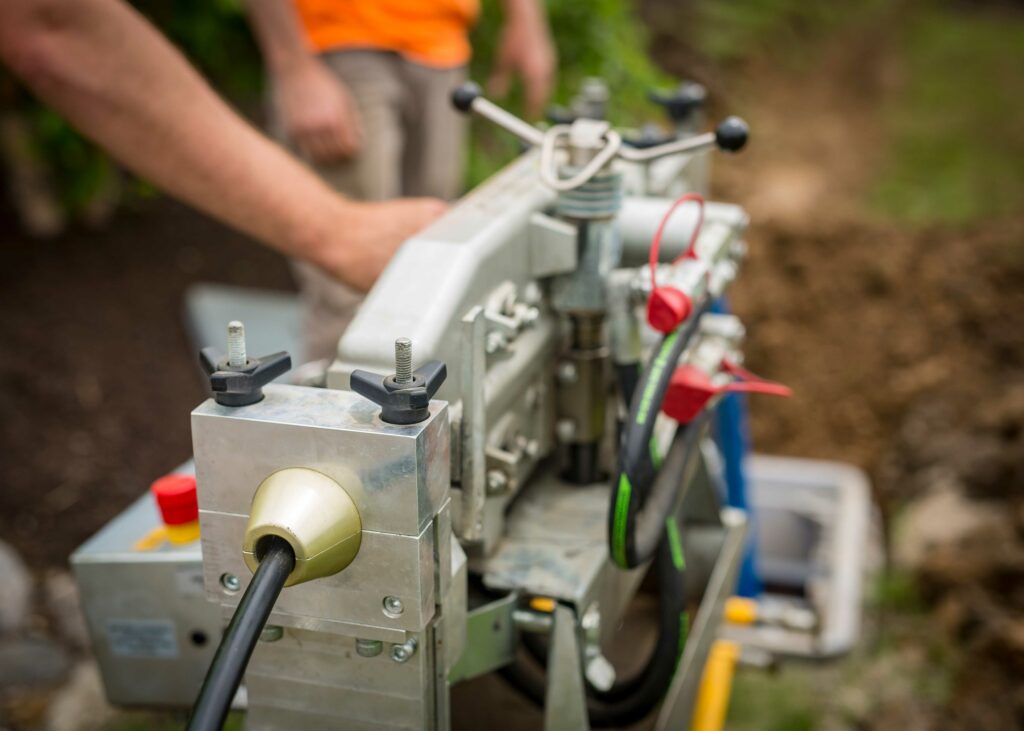
Blowing fiber begins by setting up and configuring your blowing machine. The blower needs to have the correct configuration for your fiber and duct sizes; these parts will change depending on your fiber diameter and conduit size. Make sure to have the right collets, clamps, plugs, and seals on hand before you begin set-up. A hydraulic power pack and air compressor will also need to be set up with your blowing machine.
1. Proof your duct
Once the equipment is ready, proof your duct by blowing a duct projectile or sponge through the conduit run to remove any debris or obstacles.

Image credit: GMP
2. Perform a crash test
Before you begin blowing fiber, you may also want to perform a crash test to establish the integrity of the duct. This is especially important if you are new to blowing fiber or have a new machine.
How to Perform a Crash Test – Put a small amount of fiber into the duct to simulate a fiber run and what would happen if the fiber runs into an obstacle while you are blowing. This test is helpful to see how the fiber blowing machine reacts and what to look for in the gauges if an object is hit. Pay attention to see if the air pressure increases or if the fiber slows down. We recommend doing a crash test at least a few times while learning how to install blown fiber. An experienced crew may not need to do this step if they already know what to look for on their machine when fiber hits an obstruction within the conduit.
3. Begin Fiber Prep
To prepare your fiber, a cable grip should be attached to the end of the fiber as well as a carrier or parachute that is sized accordingly. This allows the compressed air to push the parachute through the conduit while the carrier then pulls the attached fiber.
4. Apply Blowing Lube
Blowing lube should be applied to the opening of the duct before you start blowing the fiber and applied to the fiber as it enters into the duct. After the fiber is properly prepared, it should be pushed into the duct a few hundred feet using the tracks on the machine without having the air compressor on. At least one person is needed to watch the machine and the gauges for proper operation and then a second person to watch the fiber to make sure it is coming off the reel properly and then receive it once it is near the end of the run. After making sure the machine is running smoothly and the fiber is in a couple hundred feet, the air compressor should be turned on for the remainder of the installation. An experienced crew can blow nearly 2-3 miles of fiber in a few hours.
While it may take longer for the initial set-up, blowing fiber for longer runs makes installation faster. A cable can easily go a few thousand feet in one run, so there are fewer touchpoints along the run, making fiber blowing extremely efficient. You could maximize your blowing distance by setting up mid-distance assist blowers. Blowing also puts less strain on the fiber, resulting in a smaller chance of damage to the fiber, and is the preferred method if the duct run has multiple bends and undulations.
Read “5 Tips for Blowing Fiber Further” for more ways to give your team an edge while blowing fiber.
What fiber blower equipment to use
Watch the video to learn about popular GMP fiber blowers and their applications.
Our fiber blowing equipment recommendations:
- For traditional fiber: Tornado Plus Fiber Blower.
- For MicroFiber: Hurricane Plus Fiber Blower.
- See what fiber blowing accessories are available.
This is Part 2 of our 3-part series: “Pulling vs. Blowing Fiber: A Beginner’s Guide.” For more information and tips, check out Part 1 | Part 3
If you have any questions, contact a Millennium Rentals & Leasing Expert.
Future-Focused Network Owners from
Coast to Coast Look to Millennium For:
- Feasibility Studies & Network Design Plans
- Financing & Grants
- Project Resource
- Management
- Material Supply & Logistical Planning
- Equipment Leasing & Rentals